How to Do Voice Narration in Google Slides
If you think that adding voice narrations to your presentation is complicated, think again!
It's very simple and straightforward to add narration to your slides after you've got them ready.
If you haven’t already produced them, then you have to record the Google Slide voice narrations separately.
In some people's experience, it's easier to start with a slide deck and then add the audio.
However, this can be done either way; you may start with the audio and add the slides afterward, or you can start with the slides and then add the audio.
Google Slides only allows incorporating audio files into presentations. The voiceover will need to be created independently and then included in the Google Slides presentation.
Lectures with professional narrating voices are also more effective teaching tools, since they’re more interesting.
Adding Google voice narrations will offer students the best in terms of visual signals and auditory comprehension.
As though students were watching live lectures, they allow providing vital information and the context for clarifying what the slides present.
How to do Voice Narration in Google Slides
Below are the steps that you need to follow when adding a professional voice narration to Google Slides.

1. Using Google Slides
Having a Google account, you can start using Google Slides for free, which means you no longer need Microsoft's PowerPoint.
A free Google account allows you access to all of Google's cloud services, including Google Drive and all of Google's applications.
If you own a Gmail account, you can always use Google Slides.
Using Google Slides is simpler than many might think.
Visit google.com and click "Sign In" at the browser window's right top corner. Pick "Create account" if you don't already have a Google account and don't want Gmail.
The Google account can be linked to an existing email address. It's okay if it's not a Gmail one.
The alternative is to acquire a Gmail account and just use it to access Google Tools and Google Drive, including Slides, if this is all you want to do.
When you first sign up for a Google or Gmail account, you'll see a little grid-like symbol in your open browser window's top corner on Google.com.
This is the icon for your account. The available Google Tools will be shown when you click this icon. Select Google Slides from the drop-down menu that appears.
2. Recording narration
If you're using a PC, you may use Voice Memos or Voice Recorder to record your Google Slide voiceover. Online Voice Recorder is another great option.

Record your narration one slide at a time by pressing the red microphone. As you do it, you'll also be able to view the audio waveform.
Click stop when you're finished. An editing screen will appear. Get rid of all the dead air, then press Save.
Each slide should include a separate audio recording. You'll find the downloaded files in a folder with consecutive numbers in your downloads.
To use narration for a slideshow that plays continually, compose the script for all slides.
After, watch the slideshow replay to ensure that the time of your narration matches the evolution of each slide.
Make sure you have spoken in a relaxed, conversational tone. To match your audio recording, you need to adjust the script and change the pace of the slide show.
A slideshow that runs without interruption is simpler to deal with, and the audio narration can be done in a single take.
The audio playing may be broken up into chunks, or a different audio file can be used for each slide if your video presentation is lengthy or if the user utilizes self-pacing when manually clicking through slides.
Whether this is the case, check to see if the sound quality of the recordings is the same.
To ensure that the audience enjoys the smooth narrative playback, you need to listen to your audio playing attentively.
When delivering a presentation, you don't want your audience to be distracted or startled by sudden loudness or tone shifts between slides.
If your audio recording sessions take place in several locations with varying acoustic circumstances, issues might appear.
In case you want to utilize various audio files in the same presentation, attempt to record them in the same style and at the same location.
3. Creating audio files for each slide and uploading them to Google Drive
Also, Audacity or another free recorder like Movavi and any other free web recorder can be used to record your voice.
In addition, most smartphones come with a voice recording tool that's very simple to use. Alternatively, you may use Loom for a live presentation.

To record a live Google Slide voice narrations and subsequently share the video, you can also use Loom. With this plugin, you will be able to record your screen on both Mac and Windows.
A headset microphone is ideal for this kind of narration job because it allows you to speak directly and clearly into the microphone.
Either loud or quiet speaking should not overdrive the recording.
Your listeners may have a tough time understanding what you're saying if your audio is too quiet, and it may be much more challenging to construct a transcript or caption using transcription software because of the added noise.
Test your voice's sound in various locations and at various speaking volumes, both near and far from the mic, until you discover a decent technique to record a narration that plays well.
Use either.mp3 or.wav format to record your voice.
Audacity or similar audio editing software may be used to combine background music and sound effects into a single audio file.
Upload your narration audio files to Google Drive and then use the option to search for them if you have a local copy on your computer.
The audio formats supported by Google Slides are WAV and MP3.
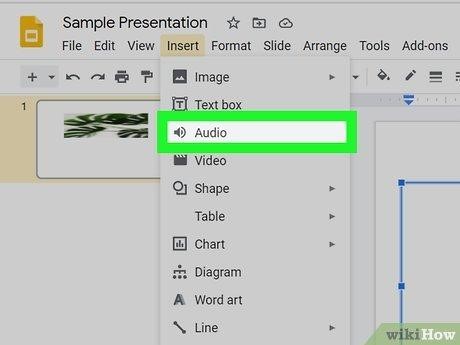
You can add Google Slide narrating voice files by opening the presentation, clicking the menu bar's Insert button, and scrolling down to Audio.
You will be able to search for any audio file on your Drive through a pop-up window.
Select the file you want to open. And there you go! Your audio has been included in the slide!
The Format choices panel will be displayed on your screen's right side if you click on the audio symbol of the slide and then choose Format options.
It’s unnecessary to click this icon each time the audio starts playing if you select Audio playback and then Automatically.
To guarantee that your audio doesn't start repeating on loop, you can choose to Stop further down on slide change.
Also, you can hide the symbol if the professional narrating voices you have recorded are playing automatically. That way, the audio icon won't occupy any space on the slide.
4. Inserting audio to slides
Open in Google Slides the slide to which you'd want to add the Google Slide voiceover. Select Audio from the Insert menu, then the audio file that corresponds to that slide.
Two things are going to happen when you input the audio clip:

You'll see a speaker symbol and a mini-player on your slide, and this will allow you to hear a sample of the audio.
You have complete control over where that symbol appears on your screen. As mentioned, a tab for formatting choices will appear as well.
The right professional narrating voices file in Google Slides by looking under the "Recent" area.
You can also choose the file by clicking on it and then selecting "Select" from the bottom page drop-down menu.
5. Configuring play settings
Choosing to have the video begin automatically is a good option for online classes.
This means that your students don't have to actively click on the audio button to listen to the presentation.
"Stop on slide change" is the option you want in this case. Alternatively, the following slide's audio will continue to play.
For each additional slide, follow these steps again. Ensure your presentation with professional voice narrations works correctly by running it in Present mode.
Your audio file's accessibility parameters can be customized based on the intended audience.
In the window's upper right corner, click the Get link button after selecting the audio file.
Click the Restricted menu button and pick Anyone to adjust to the "Viewer" access level in the next popup window that's displayed.

The Done button is in the popup window's bottom right corner.
6. Matching audio narration with the Slides Presentation
Playback of Google Slide voice narrations may be initiated in 2 ways: manually by clicking on the playback button, or automatically.
Similarly, an audio file's playback may stop or continue when copied to another slide.
Depending on the work at hand, you may choose to combine some of these capabilities.
It's possible to arrange each slide to record a distinct audio file, which can then be played automatically when the slide is seen and finished when the following slide is viewed.
7. Configuring audio settings
The best news is that basic audio modifications can always be made to Google Slide voice narrations.
After choosing the audio, you can access "Format Options" to see the default settings and options to change them in the menu bar.
Your audio file's volume can be adjusted as well. You have the option of making the professional narrating voices play automatically or by requiring a click.
To conceal the speaker icon, choose "start playing automatically" and select the option to keep the speaker icon hidden.

8. Google Slides narrating voice formatting options
Auto Play
A Google Slide narrating voices presentation may have many audios playing, but how do you have only one playing throughout the whole presentation?
A professional voice narrations file can be set to automatically play on one slide only or across the entire. This can be done by using the autoplay feature and by following these steps:
Autoplay of a single slide
- 1 Incorporate your audio file into one slide.
- 2 When you right-click on a video, you'll get a choice with several formats. To make it active, just click on it.
- 3 You'll notice it on the left-hand side.
- 4 All the slide's audio will play if you choose this option.
Autoplay for the entire presentation
- 1 Copy and paste the audio files you wish to use in your presentation onto each slide. The URL for each slide must be the same.
- 2 Then play your presentation
- 3 For the time of the entire presentation, the audio file will play automatically.
Loop
If you want the audio to keep repeating, you need to set it to loop. If you just want it to be accessible for one slide, you can stop it when the slide changes.
You must untick this box for the audio to continue playing while the slide changes.
Button size and color
Using the "Recolor" option, you can change its color and resize it.

Take your voice narrations to the next level.
Don't be afraid; even if you've never recorded Google slide voice narrations before, you'll gain confidence quickly after a bit of practice.
As can be seen above, professional narrating voices and speech can be easily added to Google Slides presentations.
As your confidence grows, you can also learn how to include background music.
Another great thing about adding narrating voices to Google Slides presentations is that you don’t even need professional recording tools.
You can manage with a computer, a headset that works well, and reliable recording software, all of which are usually available to anyone.
Google Slide narrating voices give your presentations a new dimension.
By including them, you will be able to capture your audience's attention easier, even when you’re not present to do the presentation yourself.
Most of the time, this is why professional voice narrations are needed.
So reach out to us, and our professionals here at Amazing Voice will help you make compelling voice narrations in no time.


Related Posts

Best Phones Greetings for Business
Phone greetings for business are recordings that inform customers they’ve reached the right place and guide them to solving specific issues. They are an essential part of any communication strategy, as they ensure the continuity of your business relationships when you can’t pick up the phone.

Why On Hold Messages Matter in Spa & Wellness Centers
Picture this: A potential client calls your spa to ask about services or book an appointment. The line is busy, or the receptionist is with another guest. If they’re met with silence or a generic ringtone, they might hang up.

How to Choose the Right On Hold Messages for Your Industry
Your on hold message should be as intentional and strategic as the rest of your customer experience. And here’s the kicker: not all on hold messages are created equal. Just like your branding, office decor, or website design, your industry determines the tone, content, and goals of your on hold message.